Paint has long been celebrated as a magical tool with the power to transform whatever surface or object it’s applied to. Inside or out, when it comes to DIY paint projects, picking up a brush is still the most budget-friendly and achievable way to transform every part of your home.
Don’t have the time or the money to repaint your entire house? We’ve got you! These DIY paint projects are all about creating maximum impact with minimal effort (and cost), and are guaranteed to add character and personality to any home that’s in need of a refresh. Plus, with the right tools and a can-do attitude, you can knock these over in no time at all – and we actually mean it.
From designer detailing and decorative updates, to statement finishes and everything in between, these seven weekend wonders will help you create a space that sings with personal style.
Easy DIY paint projects to tackle in a weekend

Paint an archway
Add depth and dimension to an arched doorway by highlighting the underside
People are welcoming colour back into their homes in a big way, and one of the biggest trends we’re seeing is the application of bold, contrasting colour as a way to highlight doorways.
When opting for a contrasting colour, it’s all about selecting a hue that speaks to the two spaces visible through the doorway. Find your inspiration from surrounding materials, such as the existing wall colour, furnishings or flooring, or, simply go through the colour swatch of your favourite paint brand for a push in the right direction.
If you’re feeling even bolder, why not try a striped pattern, a scalloped edge, some wallpaper – or even a decorative motif!
Pro tips: Use painter’s tape to keep your edges crisp and tidy. Apply smooth, single strokes to keep the painting neat and minimise multi-directional patterns (unless that’s the look you’re going for).

Paint your internal doors
It’s what’s on the inside that counts when it comes to decorative doorways that make a statement
Even interior doors can be given a colourful makeover with a new coat of paint. Opt for a contrasting colour to your walls, or go for a hue featured in an artwork hanging elsewhere in the room to amplify its effect. Choose heavy duty semi- or full gloss paint to stand up to high traffic and highlight the door’s detail.
Pro tips: The easiest way to paint an internal door is to carefully remove it from the doorframe, but before you do, make sure to check how much room there is between the door and the frame when closed. If the space is tight, then you’ll need to sand your edges to allow for the layers of fresh paint.
When removing a door from its frame, create a secure base by wedging door stops underneath, then remove the hinges followed by any handles or hooks, making sure to keep all the elements together in a zip lock bag for safe storage.
If your door has detailing on it, like insets or panelling, use a brush to fill in those areas first before tackling the rest with a roller for a neat finish.

Add a colourful feature wall
Transform a bedroom or living area in an instant with a high impact, low effort, pop of personality
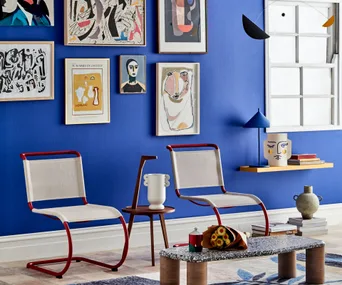
A feature wall will add impact without having to commit to painting an entire room. A DIY paint project favourite for a reason, this is a great way to start building up confidence and skills without becoming overwhelmed by the idea of a whole room refresh.
Selecting a contrasting colour will demand attention – like in this retro-inspired home – so it’s important to keep your feature wall in a place that makes sense, such as where the bed usually sits in a bedroom, or against the TV wall in a living space.
Pro tips: Selecting a shade that’s just slightly darker, or lighter, than the rest of the room will create a subtle finish that adds depth and visual interest without having to commit to a standout colour.

Transform a piece of furniture
Upcycle a tired item with a fresh lick of paint and some new handles
One of the easiest ways to add personality to a room, or make it feel brand new, is to upcycle a beloved or tired piece of furniture – like this Ikea drawer set. It’s the perfect thing to do on a lazy Sunday afternoon.
We used Jolie Paints from Pepperwhites in ‘French Blue’ and ‘Marigold’ to transform this affordable dresser two ways, for a quick and easy way to update a child’s room without busting the budget. Plus, if you want to change design direction as your child grows, all it takes is a new coat of paint to keep the piece growing with them.
Pro tips: Not all paints are created equal. Most paints will require some serious prep work and a primer before you get started. Others, like the Jolie Home range, or Blake & Taylor chalk paints are ready to apply without need for a primer. Looking for some more direction? Check out our step-by-step guide to upcycling furniture here.

Paint a decorative bedhead
Think outside the (fabric or timber) box and create your own statement bedhead
Feeling like your bedroom needs a boost? Why not try your hand at painting your own bedhead or decorative detail. Find a pattern, style or shape you’d like you recreate – such as the scalloped effect used in the family home of food stylist and editor, Emma Knowles – and get to work.
Start by selecting a colour that feels right in the space, whether influenced by your favourite bedding, the existing wall colour, or a décor piece, and map out the area you want to create with a steady hand and some good quality painter’s tape. Prep the area as required, following with at least two coats of your chosen paint.
If you’re lacking in confidence, try using a decal or stencil to mark out your design before committing to your creative vision.
Pro tips: For a rectangular style, use a level to ensure your lines are straight and painter’s tape to keep the lines crisp and defined. If you’re opting for a shapely finish such as an arc or a curved edge, use a cutting-in brush loaded with paint to easily (but slowly) define your outline, before taking on the rest with a regular paint brush.

Upcycle your outdoor pieces
Can’t afford an alfresco update? Elevate your existing items using colours inspired by your favourite designer collections
When the budget didn’t extend to the Scandinavian outdoor piece this homeowner had envisioned for her new home, she decided to take matters into her own hands, finding a similar style at the local Bunnings and painting her vision into existence. The result was a stylish success!
Whatever your vision, it’s worth seeing if your existing furniture can be upcycled to create the look and feel you’re after. Easy to apply outdoor furniture sprays, such as the Rust-Oleum range from Bunnings, or the Squirts range from White Knight, come in a variety of on-trend and classic colourways and do all the hard work for you with built-in primers.
If you’re looking for a smaller DIY paint project, then try your hand at repurposing your pot plants for a fraction of the cost of buying designer planters.
Need more inspiration? Take a look at some of our favourite outdoor settings to get your creative wheels turning.
Pro tips: Get your prep done first by removing any rust or flaking paint with a proper sanding before embarking on your colour journey. A good base will ensure your new coat of paint will stand up to the demands of its outdoor environment.

Go bespoke on a budget
Flex your creative muscle with decorative detailing
Before you give up on your Pinterest dreams of filling your home with bespoke furnishings and finishes, consider giving it a go yourself. Interior designer Jono Fleming helped his client, and long-time friend, to achieve this look by picking up a brush, and making it his personal mission to create a high-end finish – minus the inflated price tag.
By adding detailing or custom paint finishes to flatpack, affordable or less-than-desirable pieces, you can hack your way to a piece of designer furniture that’ll have people begging to know where you got it! And you’ll be all the more smug for knowing it’s a one-of-a-kind.
Pro tips: Invest in the right tools before you start. Good quality synthetic brushes and fit-for-purpose paint, will make all the difference when it comes to achieving a professional outcome. Places like Etsy are great for sourcing stencils or patterns that you can easily apply your own personal touch to.

 Photography: Will Horner. Styling: Corina Koch.


