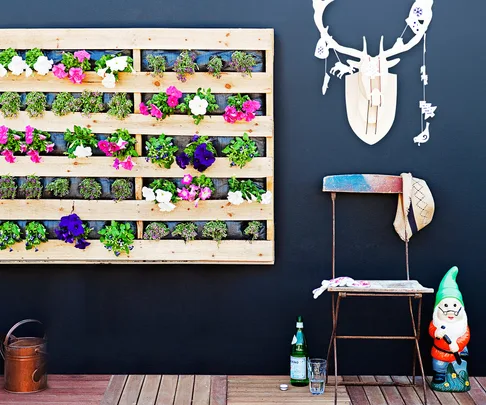
Vertical gardens are perfect for those who are limited on garden space, those who have no backyard what so ever or those that looking to liven up a boring blank wall.
Whether you use it to grow herbs, seasonal blooms or lush green climbing plants, this easy DIY pallet project, is a cost-effective and easy way to create your own vertical garden system.
Tools YOU WILL NEED
Ryobi 1350W 185mm Circular Saw, Craftright 8oz Steel Claw Hammer, Irwin 550mm Universal Hand Saw, Irwin 450mm SL300 Quick Grip Bar Clamp, Ryobi One+ 18V Cordless Impact Driver, Ryobi One+ 18V Cordless Compact Drill Driver. All available at Bunnings.
Materials YOU WILL NEED
Coolaroo 5m Prepacked Coolaroo 5m Prepacked Weed Control Mat, 4L Low Sheen Exterior Paint (optional), 1 x Pallet. All available at Bunnings.
STEP 1: Remove the slats
To give the vertical garden some strength, keep the top and bottom boards in place on your pallet. Remove the middle slats with a pry bar, hammer and a chisel and make sure you also remove any nails as you go.
Step 2: Measure and mark the slats
For the base of the planter boxes, measure the distance between the slats at the front and back of the pallet and then the distance from timber to timber for the front of the planter boxes
For this project, we’re making four planting sections within the pallet, so we need four bases and four fronts. See picture below for reference.
Step 3: Cut the timber
Use the circular saw to cut the slats you’ve already removed for the four planter boxes.
Step 4: Drill drainage holes
Clamp your base lengths to a workbench, and use the 18mm spade bit to drill several drainage holes in it. Repeat this step for the remaining three planter bases.
Step 5: Fix the planter boxes
Decide where your planter boxes will go. A good idea is to leave more space between some planters for larger plants. Put the base of the planter box in place and secure with the fixing gun. Once done, put the front in place and secure it. Repeat this until all of the planter boxes are built.
Step 6: Paint the pallet garden
Paint your pallet planter to suit the setting of where you will be placing it and apply as many coats as you need. If preferred, you can also leave your pallet rustic and unpainted.
Step 7: Homemade oasis
Once the paint is dry you can put your pallet vertical garden in place, fill the planter boxes with your favourite flowers or herbs and with a little effort, you’ve created a fantastic looking vertical garden.
WHAT TO PLANT IN A VERTICAL GARDEN
For sunny areas plant gazanias, geraniums or trailing seasonal bloomers like petunias in spring/summer and violas in autumn/winter.
For shady areas plant ferns, violets, bromeliads, begonias or cissus.
To create an edible vertical garden plant trailing herbs like thyme, oregano and marjoram or leafy veggies like spinach and lettuce.


